Tuesday, February 21, 2006

Short on dough? Use phyllo!

Dough making has always intimidated me. The challenge of coaxing little invisible organisms into aerating the flour mixture to the perfect puffiness and chewiness never failed to induce serious sweaty palms. Needless to say, sweaty palms are terrible for kneading. Normally, I am not one to shy away from a challenge. But on a Friday night when I’ve got a ravenous boyfriend on his way back from a long session at the gym, experimenting with dinner didn’t seem like the smartest idea. So what was a girl to do in a pinch? She reached for some phyllo.

The phyllo was intended for the shell of a fruit tart, which was to be made during the weekend. I imagined that the same techniques for making the tart shell would also work to make a base for a pizza. After all, butteriness and crispiness would be hard to resist in either sweet or savory incarnations. I did, however, conjure up an additional savory flare for the pizza base by sprinkling a good grated parmesano-regiano between the phyllo sheets, which introduced a nice depth of flavor.

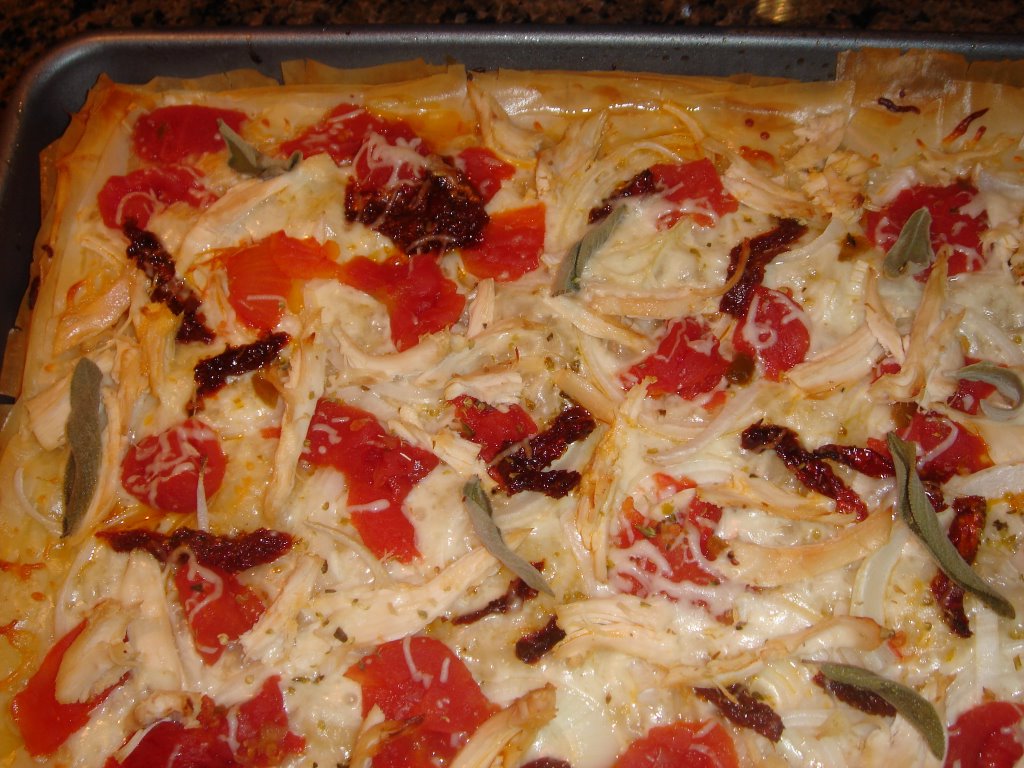
The pizza toppings were a collage of staples from my pantry accompanied by one or two fresh ingredients from the fridge. On top a cushy bed of freshly shredded mozzarella, I added some torn up pieces of stewed tomatoes, which, in my opinion, were a hundred times brighter tasting than their mealy supermarket counterparts. Some sun-dried tomato pieces were scattered for additional acidic punches while a few fresh sage leaves provided some color. Pulled pieces from the previous night’s roast chicken were generously piled on as a final touch to please the man who is always asking “where is the meat”?

It took a mere 30 minutes to assemble, bake, and get the pizza to the table. I even had a private moment to take a few sips from my glass of red before J whizzed in and bear-hugged me in his sweaty gym garb.

Simple Phyllo Pizza

3T butter, melted
3T olive oil
10 sheets fresh phyllo pastry or frozen, thawed
¼ cup grated Parmesano-regiano
1 ½ cup of shredded mozzarella
1 14 oz can of stewed tomato, well drained and torn into chunks
1 ½ cups of roast chicken pieces (optional)
1 medium onion, sliced (optional)
1 teaspoon dried oregano
1/2 teaspoon dried thyme

1. Preheat oven to 375°F.

2. Mix melted butter with olive oil and brush a 15x10x1 inch baking sheet with the mixture.

3. Cover the base of the baking sheet with one sheet of phyllo and brush the sheet with the butter and olive oil mixture. Sprinkle some grated Parmesano-regiano on top (making sure you have enough to sprinkle on each layer).

4. Repeat the above layering of phyllo, butter and oil mixture, and grated Parmesano-regiano until all the phyllo sheets have been used.

5. Place an even layer of mozzarella cheese on the top layer of phyllo and arrange the tomatoes, chicken pieces, and onion slices on top of the bed of mozzarella.

6. Sprinkle the pizza with oregano and thyme.

7. Bake pizza until the phyllo sheets are crisp and golden brown at the edges and the cheese has melted, about 15 minutes.

Saturday, February 11, 2006

Green greens


There is no doubt that southerners love their heart-attack inducing fried chicken and barbeque brisket. But no proper southern table is ever complete without an offering of greens, which invariably includes at least one of collards, mustard greens, or kale. Tough and fibrous, these hearty veggies are terrible choices for a salad, but when simmered slowly in the rendering of bacon and/or a smoked ham hock or two, they turn into stars with bold flavors that stand up to their meaty companions. More than once I have order veggie plates with heaping ladlefuls of these greens and managed to slurp it all down.

My only gripe with cooking these greens southern style is that the slow and long simmering, which breaks down the tough fibers, also turns the lovely deep emerald into various shades of brown. Besides being much less attractive looking, the “browns” also retain significantly less amounts of vitamins and other goodness. “Is there a way to serve tasty green greens?” I pondered and soon began a quest for a recipe that would deliver a huge punch of flavor without compromising the green factor.

The winning recipe was conjured up completely by accident. I happened upon a southern greens recipe a few days back that included raisins, an unusual idea to me. I didn’t think a shot of sweetness from the raisins would do very well with the often vinegar-brightened southern greens. The yellowish green color of the raisins would also get lost in the sea of browns. But something about the raisins appealed to me. Fruit accents always played well with pungent flavors, as demonstrated in classic pairing of pear with Roquefort. Maybe a dose of intense savory would set off the fruitiness of the raisins. Then a light went off and Sautéed Kale with Raisins, Currants, and Anchovies was born. The anchovies, once broken down in hot oil, leave no traces of fishiness, but impart an intense nutty flavor. The combination of yellow raisins and dark currants provide visual contrast with the greens and bursts of sweetness. The just tender kale offers a bit of crunchiness and more of its original green flavor. All in all, this is a dish with strong flavors and complementary textures.

Sautéed Kale with Raisins, Currants, and Anchovies
Serves 4-6

10 cups of washed and chopped kale (mine were about ½ inch stripes)
6 fillets of oil-packed anchovies, drained
1/3 cup of currants
¼ cup of raisins
½ cup chicken stock
½ cup water
2T of olive oil

1. Heat the olive oil on medium high in a large Dutch oven or thick bottomed pot large enough to hold the kale and has room to allow stirring.

2. Before the oil begins to smoke, add the anchovies and break them up using a spatula. Cook until the anchovies have completely disintegrated into the oil. In the mean time, cover the raisins and currants with water in a bowl and microwave for 25 seconds.

3. Add the kale to the pot all at once and stirring to coat with oil. The kale should wilt a bit from the heat of the oil.

4. Add the raisins, currants, and chicken stock and simmer without lid until the kale is just tender and still green. About 5-7 minutes. A little longer if you like it a bit softer, but don’t cook so long that it starts turning brown. Add a bit more chicken stock if the pot looks dry. Stir the kale occasionally so it wilts evenly. The done kale will be about a little less than ½ of the original volume.

5. Add salt and pepper to taste and serve immediately.

Tuesday, February 07, 2006

Praise the braise

As a recent northern transplant, I probably appreciate the warm and sunny winter days of the south more than your average Atlantan. Just two days ago, I gleefully enjoyed a leisurely cup of creamy butter pecan ice cream sitting on a park bench across from the zoo. As if to make sure that we don’t forget there are indeed four seasons, winter returned today for a brief appearance.

While little pellets of frozen rain charged against our loft windows with a vengeance, the inside of the window panes were frosted from the warm heat radiating out of our open kitchen. Not about to pass up a rare opportunity to appreciate a hearty winter meal, I had braved the rain to gather the ingredients for a braise, which bubbled away in the oven for hours.

The chosen recipe was for short ribs provencale from my newly acquired The Carefree Cook by Rick Rodgers. Picking out the book from my small collection was rather easy this time because of my new process. During the New Year, I had made myself a promise that I would cook a recipe from every new cookbook before it makes onto my bookshelf and this book, a present to myself for Christmas, has been sitting on our bar waiting to be shelved for some time now.

The recipe definitely delivered on the carefree portion of the title. All that was required on my part was to throw the ingredients into my beloved Dutch oven. The hardest part involved in making this braise is probably find something to occupy yourself during the few hours that the braise is transformed into a delicious and sticky consistency while the whole house is permeated with the most intoxicating smell that only slow cooked red meat could produce. To that, all I can say is, be patient and you will be amply rewarded.

Short Ribs Provencale (make 6 servings)
The Carefree Cook
2003
by Rick Rodgers

2 tablespoons extra-virgin olive oil

6 pounds individual short ribs
3/4 teaspoon salt, plus more to taste
1/2 teaspoon freshly ground black pepper, plus more to taste
1 large onion, finely chopped
1 medium carrot, finely chopped
1 celery rib, finely chopped
12 garlic cloves, peeled
1 tablespoon herbes de Provence
2 tablespoons all-purpose flour
2 cups hearty red wine, such as Zinfandel or Shiraz
1 3/4 cups beef stock, preferably homemade, or reduced-sodium chicken broth
One 14 1/2-ounce can diced tomatoes in juice, drained
1 bay leaf
8 ounces baby-cut carrots
1/2 cup Mediterranean black olives, such as Niçoise, pitted
3 tablespoons chopped fresh parsley for garnish (I had forgotten this)

1. Position a rack in the center of the oven and preheat to 300°F.

2. Heat the oil in a large (at least 6-quart) Dutch oven or flameproof casserole over medium-high heat. Season the short ribs with the salt and pepper. In batches, without crowding, add the short ribs to the pot and cook, turning occasionally, until browned on all sides, about 8 minutes. Using tongs, transfer the ribs to a platter.

3. Pour off all but 2 tablespoons of the fat from the pot. Add the onion, chopped carrot, and celery to the pot and reduce the heat to medium-low. Cover and cook, stirring often, until the vegetables are softened, about 5 minutes. Add the garlic, herbes de Provence, and flour and stir until the garlic gives off its aroma, about 1 minute. Stir in the wine and bring to a boil over high heat, stirring up the browned bits on the bottom of the pan with a wooden spoon. Add the broth, tomatoes, and bay leaf. Return the short ribs, and any juices, to the pot. Add cold water as needed to barely reach the top of the ribs and bring to a boil over high heat.

4. Cover tightly, transfer to the oven, and bake, stirring occasionally to change the position of the ribs, until the meat is falling-off-the-bone tender, about 2 1/2 hours. During the last 15 minutes, add the baby carrots.

5. Transfer the short ribs to a deep serving platter and cover with aluminum foil to keep warm. Skim off the fat from the surface of the cooking liquid, and discard the bay leaf. Bring to a boil over high heat and cook until the liquid is reduced to a sauce consistency, about 10 minutes (the exact time depends on the size of the pot). Add the olives and cook to heat them through, about 3 minutes. Season the sauce with salt and pepper.

6. Spoon the sauce with the carrots over the ribs, sprinkle with the parsley, which I forgot to buy, and serve hot.